
::HOME
::CONTACT
::USERBARS
::FORUM
::PUBLIC GALLERY
![]()
::HANGAR-8
::space marines 1
::space marines 2
::space marines 3
::chaos
::other
::patterns (skins)
::JORIL
::space marines
::imperial guard
::MIRAGEKNIGHT
::space marines
::chaos
::imperial guard
::eldar
::orks
::PENTAY
::world military 1
::world military 2
::world military 3
::ECHOECHO
::space marines
::chaos
::TECHNODRAGON
::eldar 1
::eldar 2
::DEATHCASTER
::NFL 1
::NFL 2
::eldar
::other, page 1
::ABRIAEL
::imperial guard
::space marines
::T'omm T'royy
::imperial guard
::ZKE
::space marines
::chaos
::tau
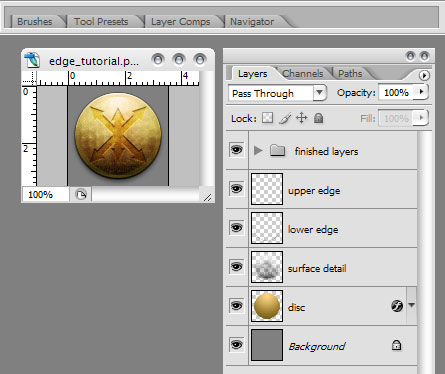
Tutorials: Manual Edge Bevel (with a bit extra).
|
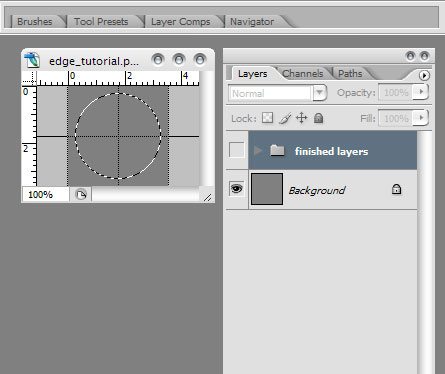
The advantage of this is twofold. One, we can use this technique with any image editing program and Two; it's much more precise for small images such as those used in Dawn of War badges. 1). Start a new image, 100px x 100px, flood fill the background (paint bucket tool in most programs) with neutral grey (RGB 128,128,128). A neutral grey background will give us something to base the image over without distracting us by being either too light or too dark. Drag some guides across to the horizontal and vertical centreline. Using the marquee selection tool set to circular/oval, drag out a circle from the centre
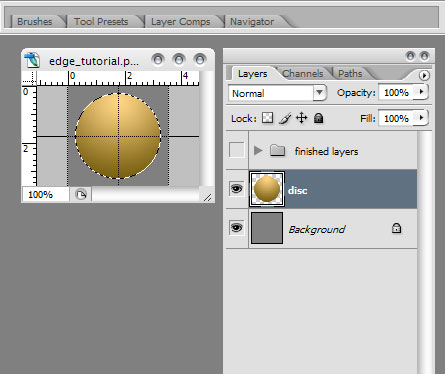
2). Next we're going to do a gradient fill. Start a new layer and choose a light beige for the top colour, and a darker brown for the lower colour. In Photoshop we choose the circular gradient fill (or the equivalent in your graphics program if it's not PS). Starting near the top, drag the fill down to just under the selected area.
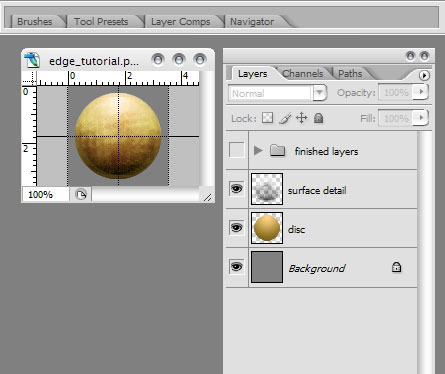
3). Add some surface details. Leaving the selection marquee active, start a new layer and use a wet media or other 'dirty' brush type, scribble in white over the top and black at the bottom. Add noise, then (in Photoshop at least), Pixilate using the Fragment filter (it's in the main Filters menu). Set the layer to Overlay.
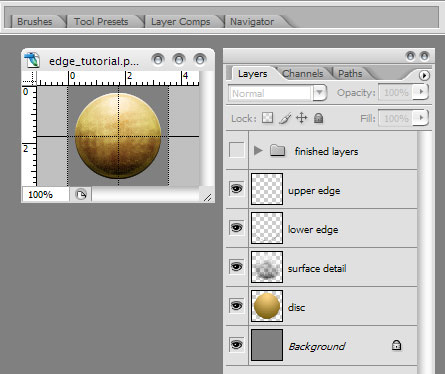
4). With the selection marquess STILL active, start a new layer, flood fill it black. Nudge the marquee up 1 pixel, and hit delete. 5). Nudge the marquee down 1 pixel again. Start a new layer, flood fill white. Nudge it down again 1 pixel, and hit delete. Set both new layers to overlay.
This technique can also be used to add surface detailing and embossing.
The PSD used in this tutorial is available HERE |
![]()
::wing tutorial
::1 pixel emboss
::remove the HUD
![]()
::page 1
![]()
| The Friendly Players List, fun online gaming without the usual hassles. Read about it HERE |
![]()
Link to this site? Use the button above.
|

Dawn of War, the Dawn of War logo, GWI, the GWI logo, Games Workshop, GW, 40k, Chaos, Eldar, Ork, Warhammer, Warhammer 40,000 Device, Space Marine, Space Marine chapter logos, and all associated races, race insignia, marks, places, characters, illustrations and images from the Dawn of War game and the Warhammer 40,000 universe are either ®, (tm) and/or © Games Workshop Ltd 2000-2004, variably registered in the UK and other countries around the world, and used under license. All materials © Copyright Games Workshop Limited 2004 except the Source Code for the Dawn of War game © 2004 THQ Inc. All Rights Reserved. |
||